Referencing commits
There are many ways to get to a commit.

master^ # E (parent commit)
master~3 # A (third ancestor)
C^^ # A (parent of parent)
B~1 # A (parent)
^B # everything except A and B
parents vs ancestors
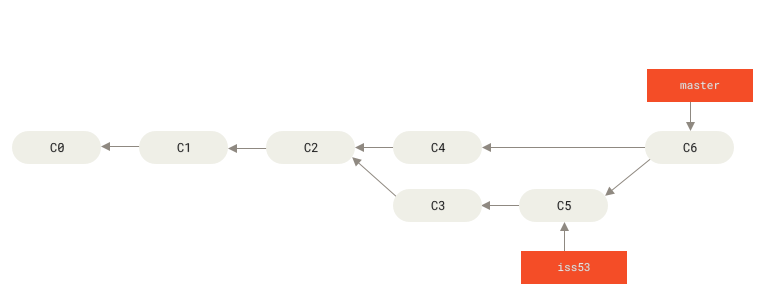
master^ # C4 -- first parent of a merge commit
master^2 # C5 -- second parent of a merge commit

iss53~2 # C2 -- second ancestor (the parent of the parent)

master^2~1 # C3 -- the parent of the second parent
Reflog
Use reflog to see the “move history” of a given ref (branch or HEAD).
I.e. what commits did the given ref point to in time (as opposed to what is the lineage of given commit).
# assumes HEAD by default
git reflog

# or given a specific ref
git reflog master

# same as
git log -g master
This adds yet another way to reference commits:
# which commit did master point to 3 moves ago
master@{3}

# which commit did HEAD point to 5 days ago
# i.e. what was I working on 5 days ago?
HEAD@{5.days.ago}
Reset
git reset has 3 modes of operation. This determines what you allow it to change
| Mode | Worktree | Staging | HEAD |
|---|---|---|---|
| —soft | ❌ | ❌ | ✔️ |
| —mixed | ❌ | ✔️ | ✔️ |
| —hard | ✔️ | ✔️ | ✔️ |
Reset modes
-
soft: only change which commit the current branch points to
-
mixed (default): move the branch and update the staging area.
(this is why we can use it to unstage changes)
-
hard: move the branch and update both staging and the worktree
A hard reset can lead to losing uncommitted changes
Reset vs checkout
Checkout is very similar to git reset --hard with a couple of key differences:
-
checkout does NOT destroy uncommitted changes in the working directory
-
checkout modifies HEAD itself but not the branch that HEAD points to
Blame
blame allow us to understand who and when made changes.
# display which commit last changed each line of my-file
git blame my-file

# limit the output to specific line range
git blame -L 5,10 my-file

# display changes to a my-file commit by commit
git log -p -- my-file
Signing commits
While git requires the user to provide basic identity information (name, email), by default git does NOT guarantee that commit author is who they say they are.
For projects that require extra security, each commit can be signed.
This is possible by using git in conjunction with gpg and the -S flag:
# create a signed commit using the configured pgp key
git commit -S -m "you can be sure I made this commit"

# displays signature information for each commit
git log --show-signature
We will not cover the details of how to setup or use gpg keys, but I’ve linked additional resources and guides if you are curious.
Tags
Tags can be used to mark important milestones in a project’s history (such as release versions e.g. v1.0)
Git supports 2 types of tags:
-
Lightweight - very similar to a branch, but cannot be changed
-
Annotated - similar to a signed commit, but holding additional tagging details
Lightweight tags
The main difference between a Lightweight tag and a branch is that tags CANNOT be changed to point to a different commit.
# tag the current commit as v2
git tag v2.0.0

# tag a previous commit in the history
git tag v1.0.0 7ca1be
Annotated tags
Annotated tags create their own object (similar to a commit). They can be signed (like commits). They CANNOT be moved as well.
# create a unsigned annotated tag
# notice annotated tags have their own message
git tag -a v2.3.0 -m "Release v2.3: Blue Kiwi"

# create a signed annotated tag
git tag -a -s v2.5.0 -m "Notes for version 2.5"
Manipulating tags
# list all tags (both Lightweight and annotated)
git tag

# list all tags matching pattern
git tag -l v2*

# delete a tag
git tag -d v1.75-tmp
Tags are NOT shared by default, you have to push them explicitly:
# push all tags to the origin remote
git push origin --tags

# push tag v2.0 to the remote called github
git push github v2.0

# delete a tag on a remote
git push origin --delete v2.0
Bisect
Bisect allow us to find which commit introduces a bug (or any specific behaviour we might want to pinpoint).
It uses a binary search to jump around the project history, allowing you mark whether the selected revision
is either good or bad
Bisect will try to choose the minimum number of commits you need to review.
# start the bisect process with the current commit
git bisect start

# mark the current commit as bad i.e. containing the bug
git bisect bad

# mark a commit as good i.e. not containing the bug
git bisect good 25aef7

# return to the initial commit (before the bisect)
git bisect reset
You can use an appropriate command to automatically validate if the commit is good or bad. (e.g. compile the code, run tests or performance benchmarks)
# execute the given script to mark
# commits as good or bad
# based on the exit status of the script
git bisect run my-test-command
Multiple work-trees
Git allows you to have multiple versions checked-out at the same time:
# creates a branch called bugfix and checks it out
# into a working directory called bugfix
# in the parent of the current directory
git worktree add ../bugfix

# checkout branch origin/broken into a
# separate working directory in your home directory
git worktree add ~/my-project-bugfix origin/broken
# list all worktrees
git worktree list
# delete a worktree, needs to be clean
# the corresponding branch is still
# part of the project history
git worktree remove bugfixEach worktree is a linked copy of the repository that maintains its own state while sharing the same object database, ensuring all trees stay synchronized with the main repository.
Multiple histories
Sometimes it might be useful to start a branch that is completely disconnected from the project’s existing history.
This is useful when you want to keep track of a set of related files that change semi-independently from the main-line history of the project (e.g. build artefacts)
# create an orphan branch called deploy
# there are NO commits on this branch
git checkout --orphan deploy
The state of the worktree is unchanged, but all files will be untracked.
Use case: deploy branch
After creating a disconnected (orphan) branch, you can
delete or ignore all “regular” project files, committing
only your output / build directory.
By committing these artefacts separately, you avoid needing to resolve conflicts in them when modifying the main-line code.
But also, the artefacts stay versioned and within the same repository.
This was the most popular way of setting up github pages, until the introduction of
Github actions
Use case: cleaner public history
When publishing / open sourcing a project it might not be appropriate to publish the full history of commits.
In these cases an orphan branch can be used to established a “cleaner” history that you can comfortably share on the internet while keeping the full history intact.
You can then push each line to its own remote (public and private).
Submodules
If you put a git repository inside another git repository,
the top-level is called a superproject. The nested repository is called a submodule.
Each repository will have its own independent history. The superproject stores only the sha of currently checkout commit of each submodule.
This is useful when importing the code for a dependency (e.g. a library) and you want to have fine-grained control over which version you want to use.
It is also useful when you want to work on several projects together, but keep their histories separate.
# add an existing repository as a
# submodule of the current repo
git submodule add path/to/other/repo

# clone a repository including all submodules
git clone --recurse submodules
Knowing something exists does NOT mean you have to use it.
In most day-to-day git use-cases, you would not need to use the features discussed in this section.
But in that one situation when you need it - you will know!