COS 3100:
Intro to GIT
menu ▾
lessons
tags
extras
links
syllabus
homeworks
online terminal
view full lesson
lessons
tags
extras
links
syllabus
homeworks
online terminal
view full lesson
## 4. Basic git commands An overview of basic git commands - everything you need to work with a local repository --- ## Short recap - Repositories are databases for content versions - Commits are snapshots of the content of a repository - Changes must first be added to the staging area before going into a commit --- ## Config Git is highly configurable. Configurations can be applied on multiple levels. More specific configurations overwrite more generic ones. - repository - user - system --- View the current configuration: ```bash # list config options specific to the current repo git config list --local # list user-level config options git config list --global # list the system-level config options git config list --system ``` --- Modifying config options: ```bash # tell git to use VSCode as the default editor # globally git config --global core.editor "code --wait" # tell git to use a different email when committing # for this project git config --local user.email personal@mail.com # unsetting a config option git config --local --unset user.email ``` --- ## Init Creating repositories is simple. It creates a `.git` directory. The current directory becomes the **working directory** ```bash ## inside a directory that you want to track git init ``` --- ## Status The `status` sub-command provides information about the state of the repository. ```bash git status # prints the following info: # On branch main # Changes to be committed: # ... # Changes not staged for commit: # ... # Untracked files: # ... ``` --- ## Ignoring files There might be files in the working directory that should NOT be part of the project's history. Such files can be added to the special `.gitignore` file: ```bash # sample .gitignore file .env secrets/ tmp/ ``` --- ### Gitignore syntax ```bash # for comments subdir/ # everything within subdir /.secret # in repo-root directory only private-* # wildcard ! # = exception (i.e. don't ignore) # ignore all .md files, except readme *.md !README.md ``` --- ## Do NOT leak sensitive data It is a common mistake for git-noobies to expose sensitive data when sharing their repositories online. Make sure to add any passwords, api keys, environment details, and other valuable files to your `.gitignore` file. --- ## Add Remember, `add` does NOT make changes part of the history. It only adds them to the staging area. ```bash # add all files (including untracked) git add -A # add only changes to already tracked files git add -u # interactively add specific hunks git add -p # add specific file(s) git add my-file.txt readme.md ``` --- ## Reset Use `reset` to un-stage a change i.e. the change will no longer be in the next commit. The changes are still present in the working directory. --- ```bash # removes changes to the file from # the staging area git reset filename # interactively remove hunks from # the staging area git reset -p ``` <class-note> Reset is a very versatile command. **Some options may lead to data loss** </class-note> --- ## Diff `diff` allows us to compare changes: ```bash # view all changes between working directory # and the latest commit git diff # view all changes in the staging area git diff --cached # view changes to a file since the last commit git diff my-file.txt ``` --- ## Clean `clean` *deletes* untracked files from the working directory: ```bash # remove untracked files in the top level dir git clean # preview which files will be deleted git clean -n # remove all untracked files recursively git clean -d # remove untracked and ignored files git clean -x ``` > **Warning**: the files will be totally lost --- ## Commit Creates a commit with all changes in the staging area. ```bash # opens the default editor for a message git commit # inline message git commit -m "my awesome commit" # add extra changes to the last commit # (actually creates a new commit) git commit --amend ``` --- ### Commit internals Internally git stores everything as graph of object files. Once created, commits can NOT be modified. 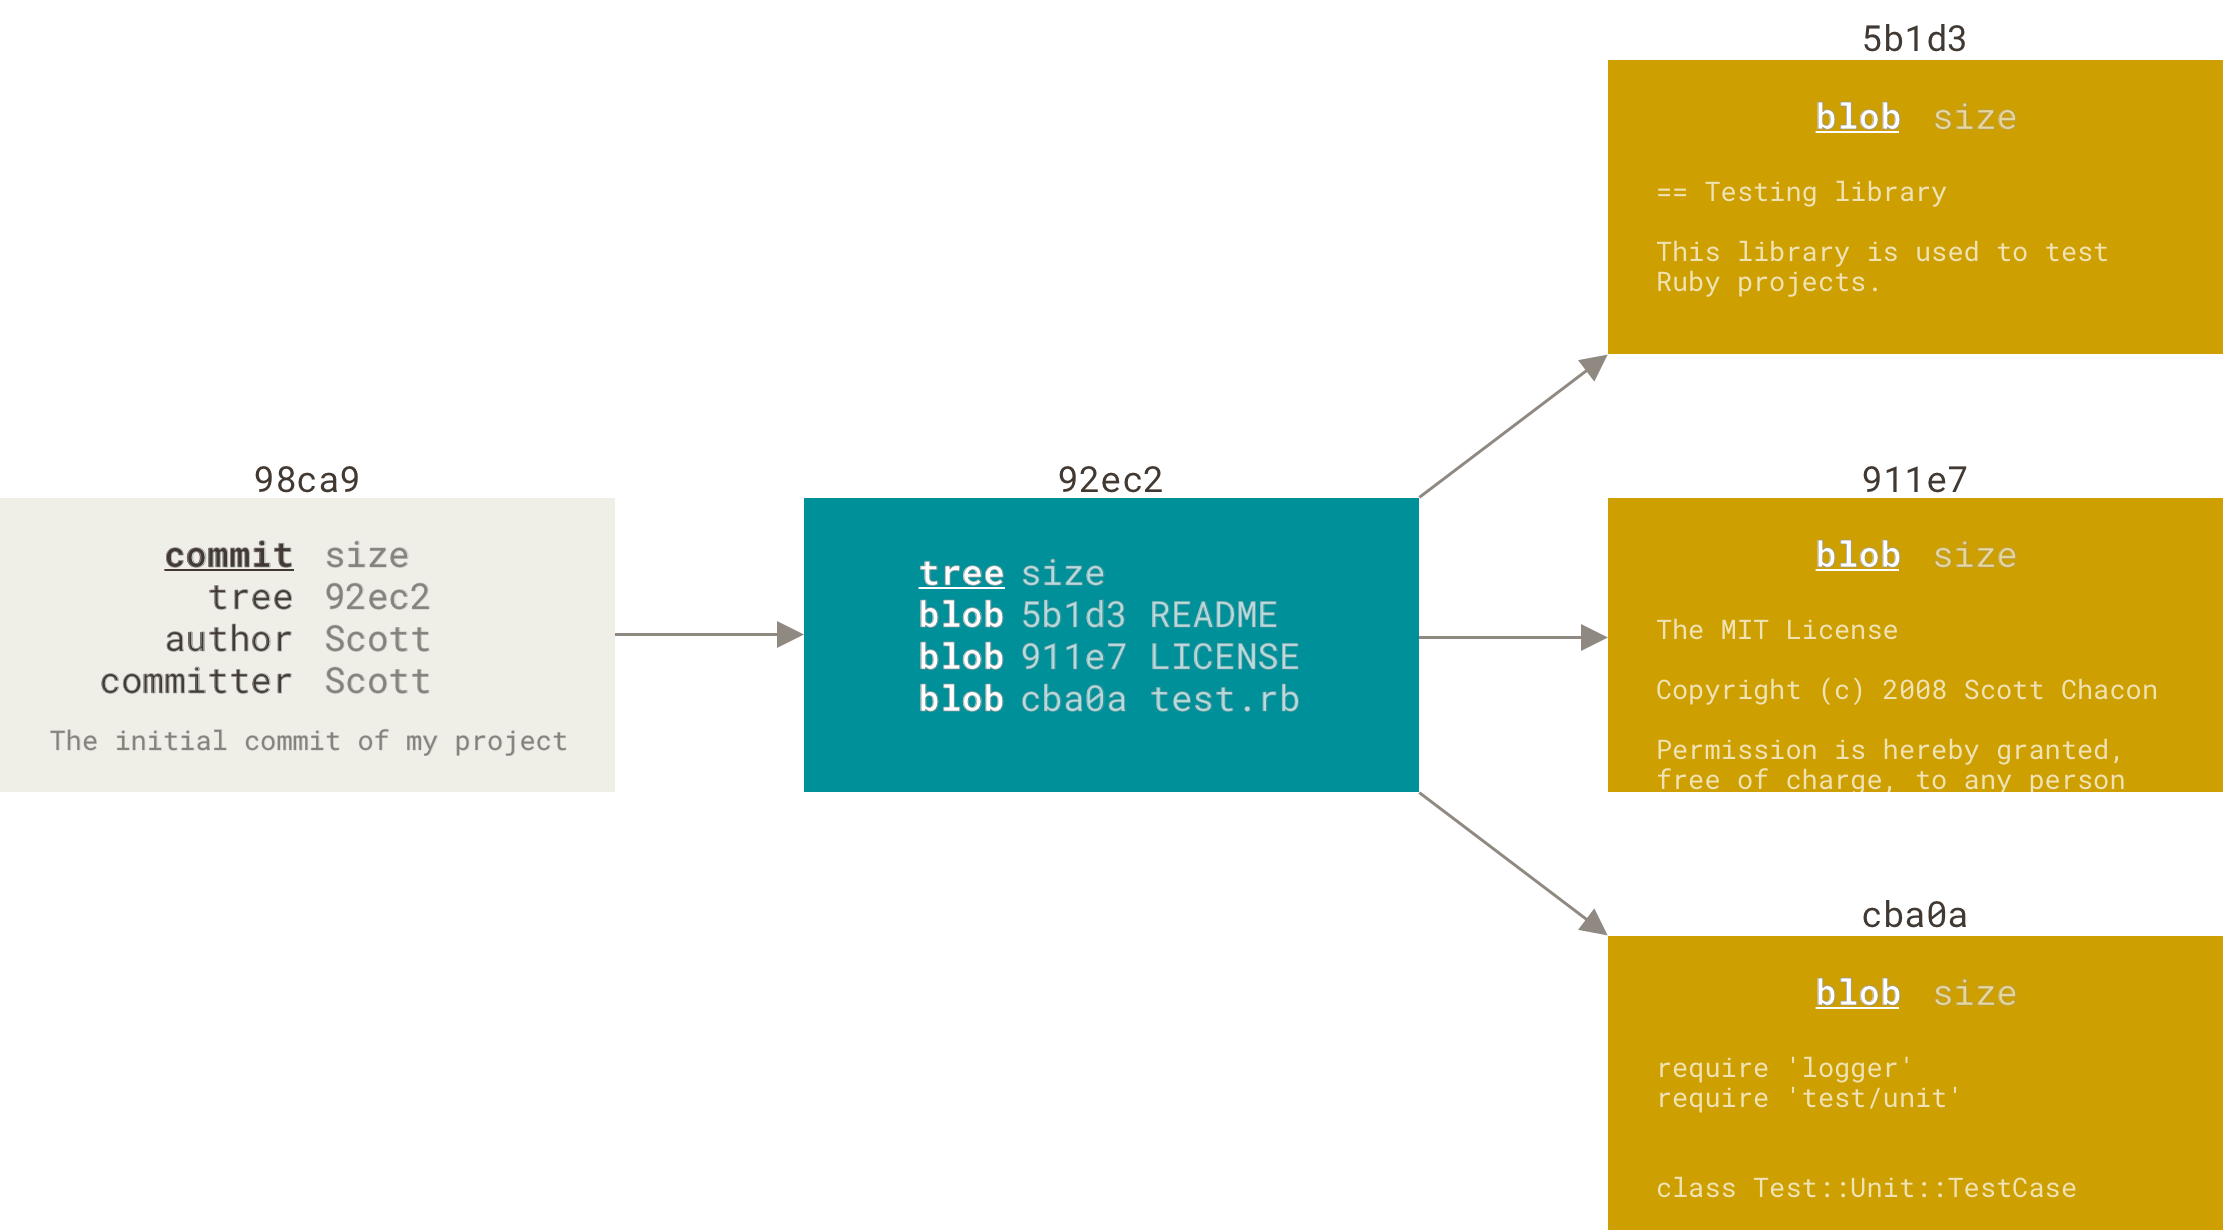 --- ### Writing good commit messages Writing clear, short, consistent and meaningful commit messages is very important. ```bash # Bad examples git commit -m "fix" git commit -m "changed stuff" git commit -m "asdfgh" # Good examples git commit -m "fix: resolved login timeout issue" git commit -m "feat: added dark mode toggle" git commit -m "docs: updated install instructions" ``` --- ### Committing: Best Practices - **DO**: Commit often (multiple times per day) - **DO**: Each commit should represent one logical change - **DON'T**: Wait days/weeks between commits - **DON'T**: Commit broken/untested code --- ## Show Displays information and changes introduced by a commit. ```bash # display info and all changes in the current commit git show # displays info and just the list of changed files git show --stat # view changes introduced by a specific commit git show a3ef75 ``` --- ## Restore `restore` **overwrites** the contents of the files in the working directory and/or staging area. ```bash # SAFE: removes changes from the staging area # working dir is untouched git restore --staged filename # discard changes in the working directory # changes will be lost! git restore filename ``` > **Warning**: with some options the changes will be totally lost --- ## Remove `git rm` tells git to no longer track the given file ```bash # stages a change to no longer track the file # in the next commit # DELETES THE file from the working directory git rm filename # only stages an instruction to git to # no longer track the file in the next commit # file in working directory is untouched git rm --cached filename ``` --- Telling git to no longer track a file does **NOT** remove previous versions of the file from the repository. We will learn how to do this later. --- ## Log Use the `log` sub-command to view the history of changes: ```bash # displays a detailed view of all commits git log # displays a short view of all commits git log --oneline # displays a short view of all commits # including file change stats git log --oneline --stat ``` --- ## Visualization the commit lineage Each commit holds a pointer to its parent commit. 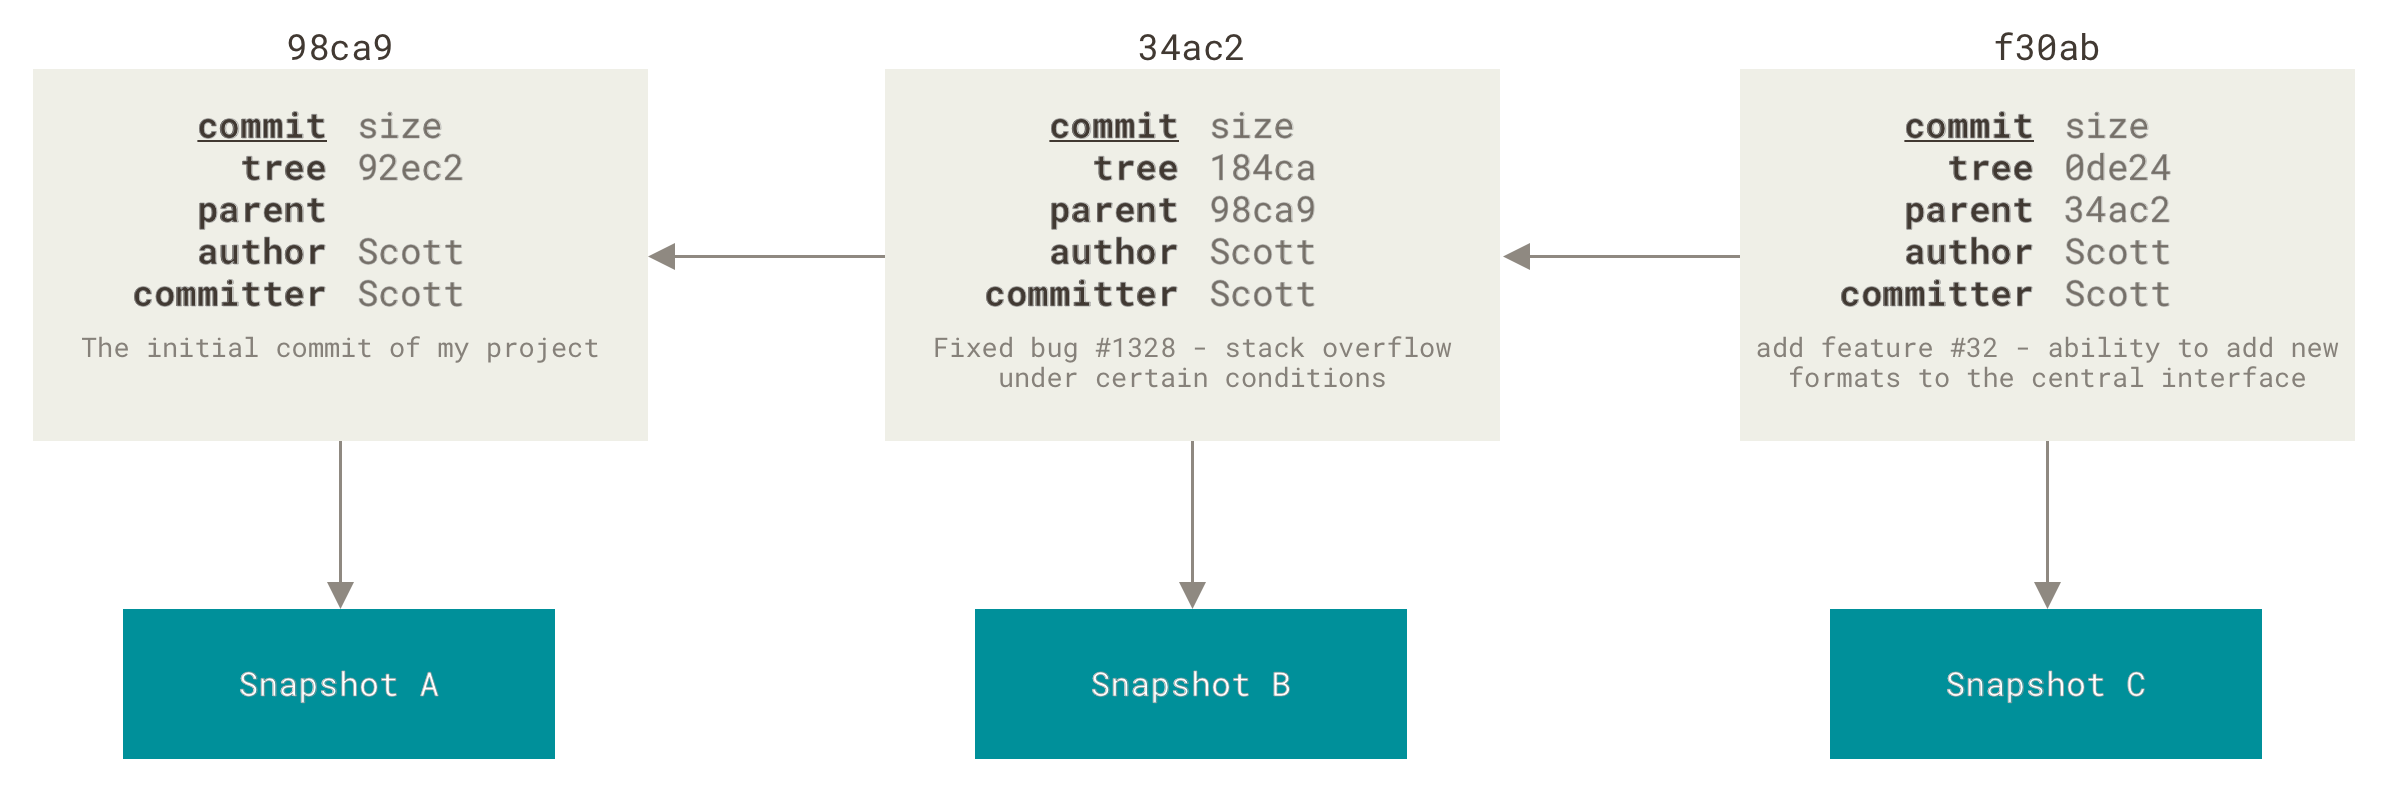 --- ## Practise to learn <class-note> Git is a very practical system. The aim of this course is to help you learn to use it daily and seamlessly. But for that to happen you need to practise on your own. **Start using git to track your projects today**! </class-note> --- <class-work> ### Your first repository 1. Create a directory in your home directory called `hello-git` 2. Create a repository within the "hello-git" directory 3. Create a couple of text files (with whatever content you want) 4. Commit these files to git 5. Modify the files (contents and rename) 6. Examine the state of your repository 7. Commit the newly made changes 8. Examine the repositories history </class-work>
Intro to git
::
Working with remote repositories
Intro to git
::
Working with remote repositories